I’ve been using both TENS and EMS for years and own a box full of units but surprisingly, I didn’t have a wireless machine in there.
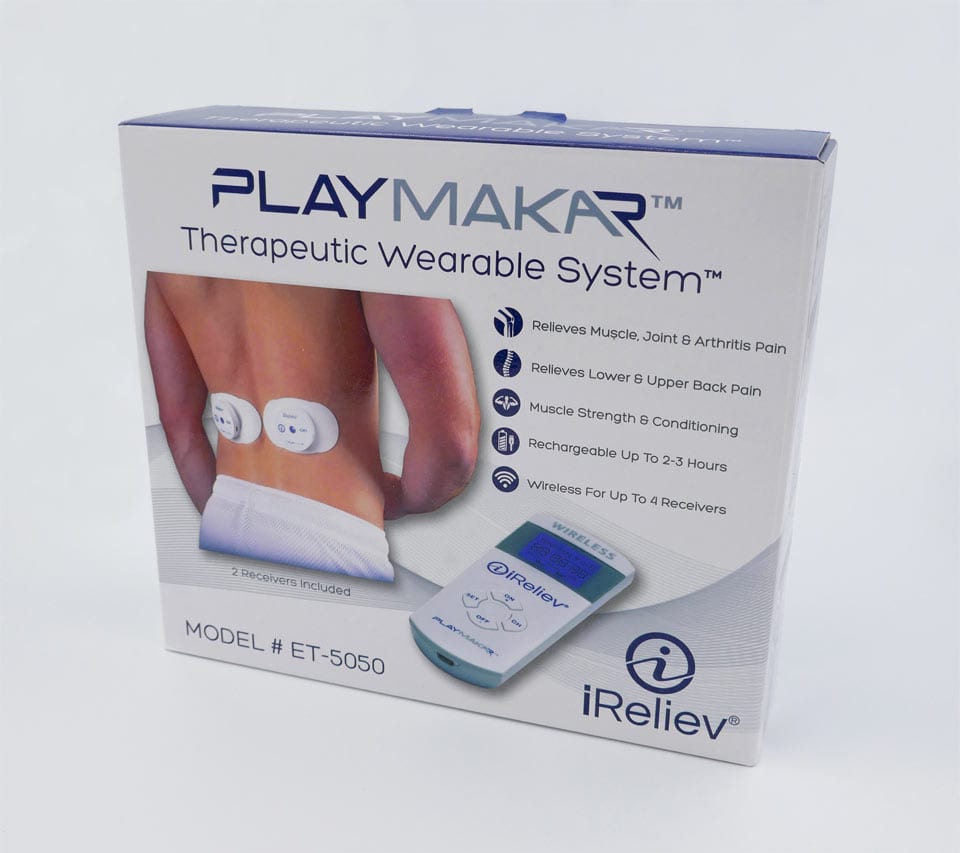
That was until I got my hands on iReliev’s Therapeutic Wearable System, an exciting new product from this burgeoning brand.
It’s an all round electrotherapy device designed to relieve muscle, joint, and arthritis pain, as well as aid in exercise preparation, recovery, and muscle conditioning.
So without further ado, I’m super excited to tell you everything I discovered about the machine in this iReliev wireless TENS and EMS unit review.
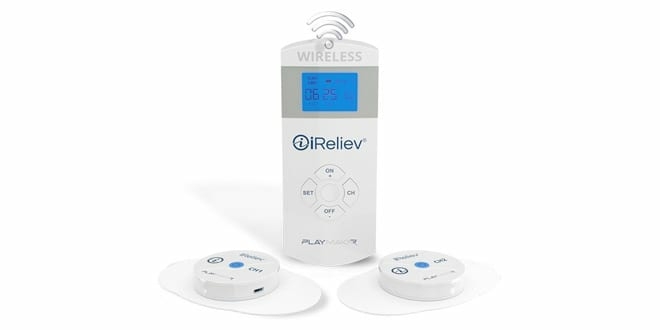
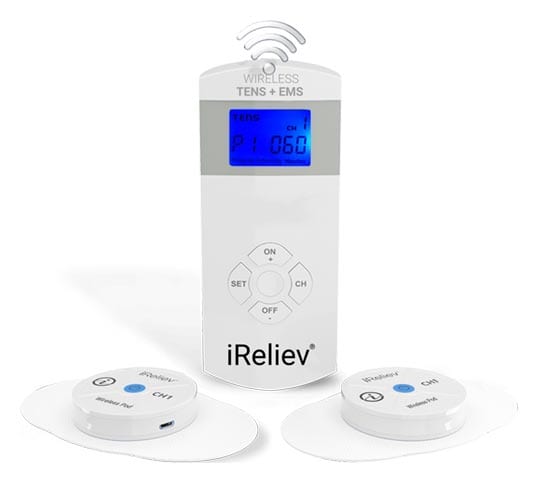
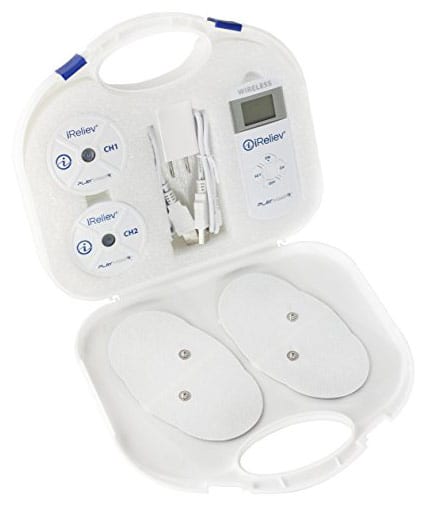
iReliev TENS + EMS Therapeutic Wearable System
The Verdict
One of the most versatile and unique TENS and EMS units on the market. Expand the system with additonal pods to target a larger area or more areas simultaneously.
Pros
- TENS and EMS programs in the same machine
- Completely wireless
- Fully isolated channels
- Rechargeable remote and wireless receivers
- Quad channel option with extra wireless receivers
- Hard shell made to measure carrying case
- Portable in every sense
Cons
- Higher initial investment than budget machine
- Only works with iReliev pads
Programs and Modes
The unit has 14 programs in total. Eight of these are for TENS therapy and 6 of them for EMS. If you are unaware of the difference, read about TENS vs EMS to understand.
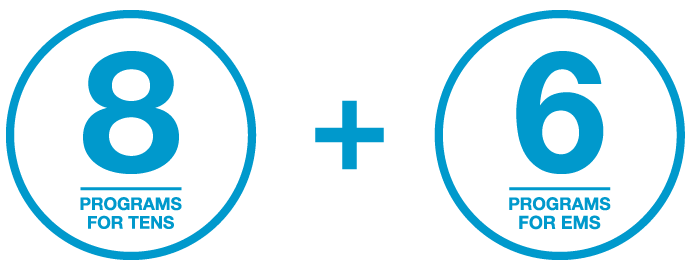
So the TENS programs are designed to provide relief for both chronic and acute pain. TENS program 8 (P8) has been specifically created for: “symptomatic relief and management of chronic, intractable pain and relief of pain associated with arthritis.”
The EMS programs are for exercise preparation, to aid recovery, to build endurance and strengthen muscles.
When I first started testing the device I was using EMS P5 (Build Endurance) on my lower back. I’ve had a few problems there recently, especially under the ribs and in the hip area on my right side.
I want to strengthen the muscles, while improving flexibility. The program felt nice and was working the muscles in the lower back.
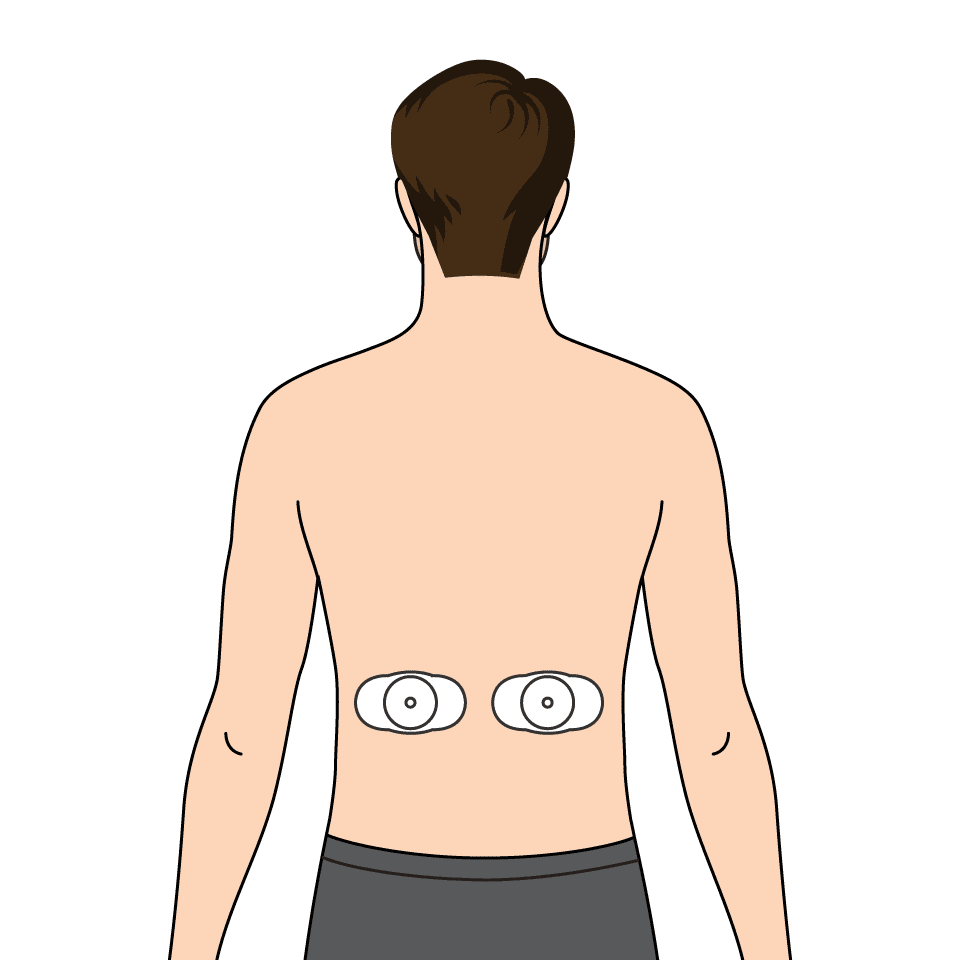
Diagram for illustrative purposes only – this is not advice on how to use the machine or where to place the pads.
I’ve been using it daily for the past few days and find the stimulation to be effective and comfortable. I’ve noticed increased mobility in my spine, ribs and the hip area both immediately and in general because of the therapy.
To test out the other modes I used P1 (Exercise Prep) before an indoor bike session. I placed the pads on my calves and ran the program for 10 minutes, as advised in the instruction manual.
I didn’t crank up the intensity to a high level and I wanted to warm up the muscles gently and reached a maximum of 6 out of the 25 available levels. I found it to be comfortable and gentle.
When I got on the bike I was able to get going quickly and my legs felt good. Just to be clear here, I wasn’t using the EMS at the same time.
After going at it hard on the bike for 40 minutes I got off and cleaned the sweat off my legs, before popping the pads back on my calves.
I used P4 (one of the three active recovery programs) for 20 minutes. It was lovely – apart from when I tried putting the intensity too high at the start!
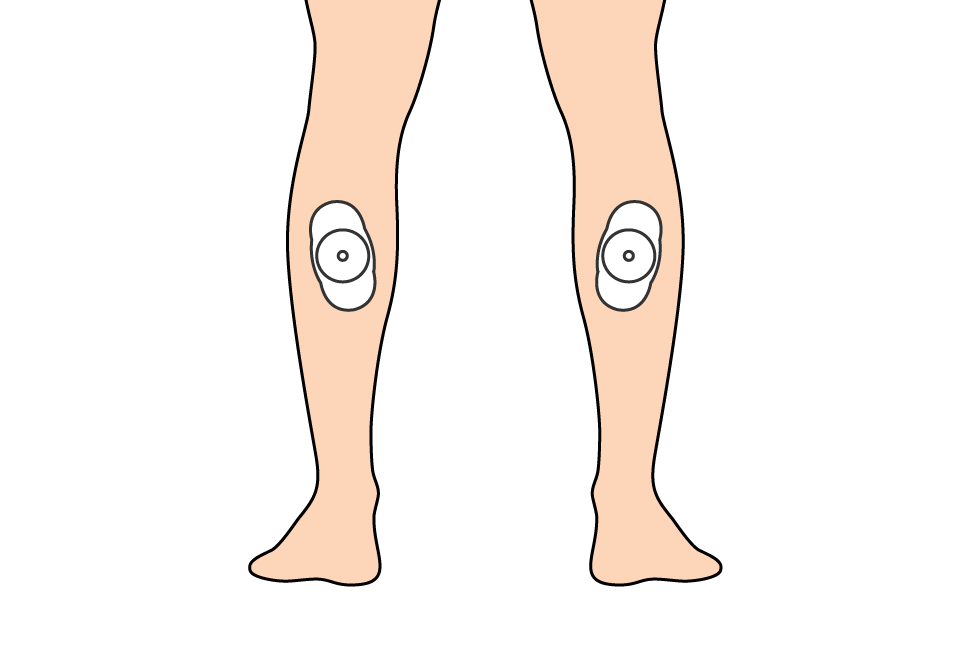
Diagram for illustrative purposes only – this is not advice on how to use the machine or where to place the pads.
I went up to level 7 which was way too high for me. I quickly took it back down to 5 and kept it there for the rest of the session, and that was just right for me.
Although this wasn’t the highest intensity exercise I’ve ever done, my calves felt great afterwards and I didn’t feel any heaviness in them after the session or the next day. Very impressed with those two programs and how they worked for me.
Over recent years it’s become increasingly popular to combine conventional exercise with EMS and use both at the same time during a workout.
The idea being that the EMS activates more muscle fibres and deeper muscles that conventional exercise doesn’t – and certainly can’t – at the same time.
In theory this makes it more efficient and of course, because the stimulation makes the muscle contract – it means there’s very little – if any impact on the joints. This is one of the main reasons why EMS is such a popular tool for rehabilitation and retraining muscles.
This video of professional bodybuilder J Warren shows how he uses the device to supplement his training. You can see him weight training with EMS at the same time:

I’m yet to try combining EMS with conventional exercise myself, however I’m becoming increasingly tempted to give it a go sometime soon!
I’ve been using EMS for years but used it mainly for warming up, preparing for something like a ski trip, but my most common use for it has been as a post workout recovery tool.
It’s a great technique for increasing blood flow, removing waste products (lactic acid), and relaxing after rigorous exercise. Sometimes I’m a bit lazy to stretch after working out and that’s when EMS comes to my rescue and does the work for me!
Once I’d done some experimentation with the EMS programs I moved on to test out its Transcutaneous Electrical Nerve Stimulation (TENS) capabilities.
I tried them out all of the TENS programs to see how I liked them. With TENS you’ll find it’s a case of seeing how they feel, which you find the most pleasant and how you respond them.
They are essentially pre-programmed stimulation patterns that send low voltage electrical pulses to the skin.
My personal favorites are:
– P2: These pulses feel fast but soft and hit the spot. What I loved about this one was how the pulses were alternating between channel 1 and channel 2, rather than being in sync. This felt really nice. It was like a sensation on the right of the back then the left then back to the right and alternating like this.
– P3: These are very long, soft, soothing pulses. I was super relaxed using this program. I could imagine watching some Netflix and relaxing in front of the TV with this. It’s a constant mode so the pulses are consistent in duration and width so it feels even and continuous.
P7: I found this one relaxing as well but because it’s a modulated mode it was slightly more intense than P3. Modulated patterns cycle between pulse width and rate, shocking the nerves and stimulating them in different ways.
With P3 it was more in the background for me, doing its thing. I could use P3 on a low-medium level of intensity and let it work in the background, hardly knowing it’s there.
Whereas with this one (P7) I always know it’s there due to the stimulation pattern, which isn’t necessarily a bad thing. But I’d certainly use them in different situations, depending on my pain and area of the body.
What I love about this TENS and EMS combination device is that you have the best of both worlds. There’s a really useful and varied selection of programs packed into that neat little remote!
Session length can be set from 5-60 minutes. This can be adjusted in increments of 5 minutes. For the EMS programs iReliev recommends specific durations for a session, ranging from 10-30 minutes, depending on the program.
For TENS therapy sessions they recommend starting with short sessions of 5-10 minutes in order to get your body used to the stimulation. If you’re ever unsure of how long or frequently to use the device, consult a medical professional.
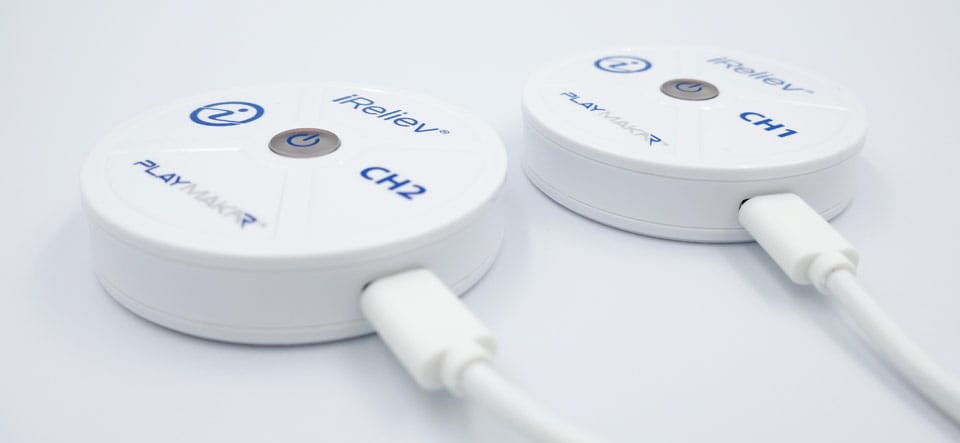
Channels
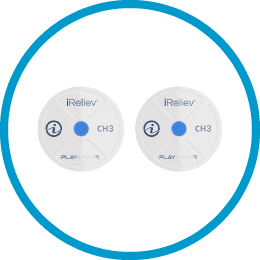
The device ships with two wireless receivers for channels 1 and 2 meaning that you can choose to treat one or two areas or sides of the body simultaneously.
But anybody who’s used a TENS or EMS unit before will probably have been able to do that.
So what’s the big deal?
The great thing here is that you don’t have to use two pads to target each area. iReliev describes the pads as being:
“For Large Body Parts & Muscle Groups”
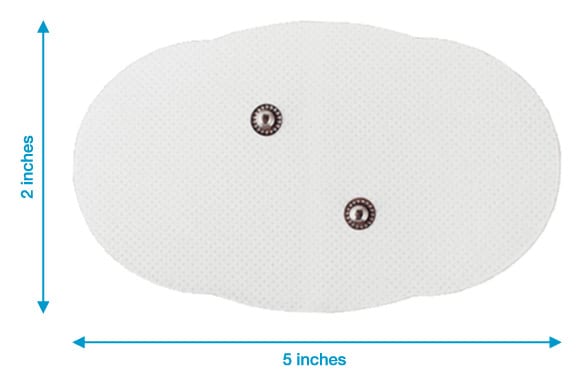
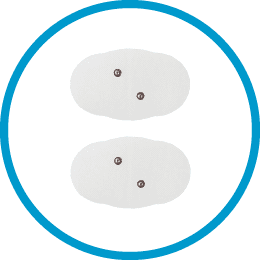
The 2” x 5” oval shape pads with this device kill two birds with one stone. You don’t have to mess about placing two pads for each area / channel, as you do with a traditional TENS unit. This means it’s quicker, more convenient and easier to target an area.
When comparing the pads from this device against others, be aware than one of these does the same job as two from a normal non-wireless TENS machine.
Don’t be fooled into thinking that a standard dual channel machine with four pads would be the same as using four pads on this machine.
That would only enable you treat two areas simultaneously, whereas four pads (and four wireless receivers) with this enables you to treat four areas at the same time.
And if you decide further down the line (or at the time of purchase) that you want to use four pads at a time, you can do so.
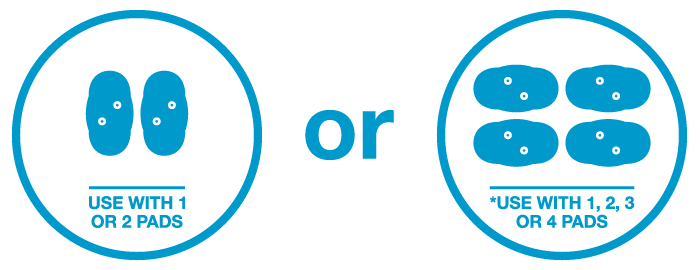
*By purchasing iReliev’s Expandable Wireless Pods kit you can supercharge your setup to enable you to use 4 pads and turn this into a four / quad channel TENS EMS unit. Very impressive.
The most exciting feature with the channels is still to come though…
Not only can you set the intensity independently for each channel but you can run different programs in all of the channels, simultaneously (this is something I first came across on HealthmateForever TENS units).
This wearable system is a truly versatile TENS and EMS machine with fully isolated channels.
Intensity Levels
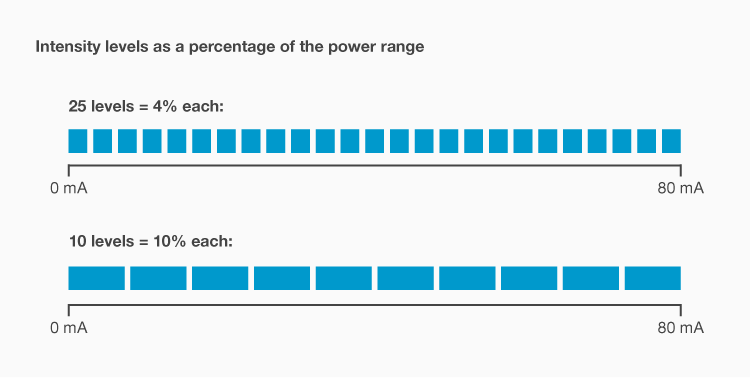
The device has a power output of 80 mA, which is pretty standard.
Electrotherapy expert Professor Tim Watson explains this:
Although this is a small current, it is sufficient because the primary target for the therapy is the sensory nerves, and so long as sufficient current is passed through the tissues to depolarise these nerves, the modality can be effective.
Most TENS units on the market offer up to 80 mA of power output. And as explained above, that’s going to be sufficient for the majority.
There are some machines on the market that offer up to 100 mA in power. Please be aware though when you’re comparing them against this that they don’t have EMS capabilities and they’re not wireless TENS units.
If you’re familiar with iReliev’s other products you’ll know its other machines come with 25 intensity levels, and this is no different.
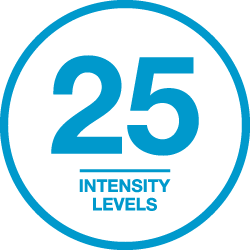
This is a good amount of levels. The number of intensity levels does not reflect how powerful the device is (remember that’s specified in mA, this one is 80 mA).
The amount of intensity levels is simply the amount of control you have over the power output, the increments in which you move up or down. Think about it like the volume control on your TV.
With 25 levels, each time you adjust the intensity by one you’re going up or down the total power output by 4%.
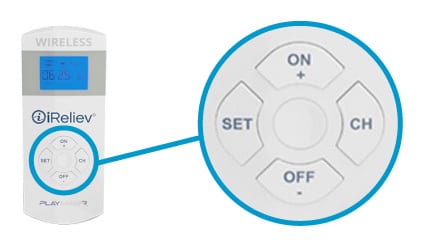
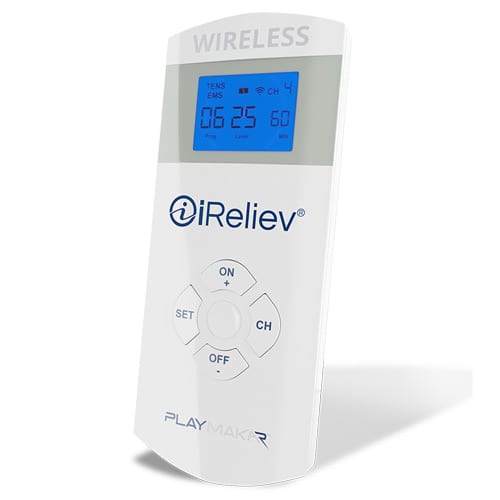
There is a + key and a – key on the wireless hand remote, along with a CH key which allows you to toggle between the channels.
The intensity is adjusted by selecting the channel, then pressing the set button until the 0 above the word level flashes.
Then all you have to do is press the + key until you find your desired level. You can adjust it up or down at any time during your session with this process.
When I was using the TENS programs I didn’t go beyond level 14 for any of them, for most of them a comfortable level was under 10. The device was more than powerful enough for me.

Ease of Use / Operating the Device
I have to say, before I started using this system I was expecting the setup and operation to involve pairing the remote with the the wireless receivers.
I thought it was going to be like pairing a bluetooth accessory with a smartphone.
How wrong I was!
Once you’ve pushed the wireless receivers onto the electrode pads you remove the clear plastic backing and place the pads on the area you’re treating.
Then all you have to do is switch the wireless receivers on then the remote and it automatically pairs the receivers with the remote. This all worked seamlessly for me.
There are four keys for controlling the unit, they are clearly labeled and easy to read:
- ON / +
- OFF / –
- SET
- CH
The controls are super easy to use, nicely spaced out and responsive when you press them.
The device is very intuitive, the designers have kept it extremely simple which makes it a doddle to use. It’s easier than operating a smartphone!
There are two main buttons to be aware of: ‘SET’ and ‘CH’. As I mentioned previously ‘CH’ toggles between the channels. Then you use the ‘SET’ key to toggle through the settings and select the ones you want.
For example, when you press ‘SET’ the program flashes. So if it’s on TENS and you want EMS, you simply press the ‘+’ or ‘–’ key to toggle between TENS and EMS.
Press the ‘SET’ key again and the program number flashes, use the ‘+’ and ‘–’ keys to toggle through the programs and choose the one you want.
Pressing ‘SET’ again takes you to the session timer, adjust to your liking with the ‘+’ and ‘–’ keys.
Finally, pressing ‘SET’ again will take you to the intensity controls. And surprise, surprise the ‘+’ and ‘–’ keys are used to select the intensity level.
There’s nothing in the slightest bit that’s complicated or confusing about operating this device. It’s easy as ABC.
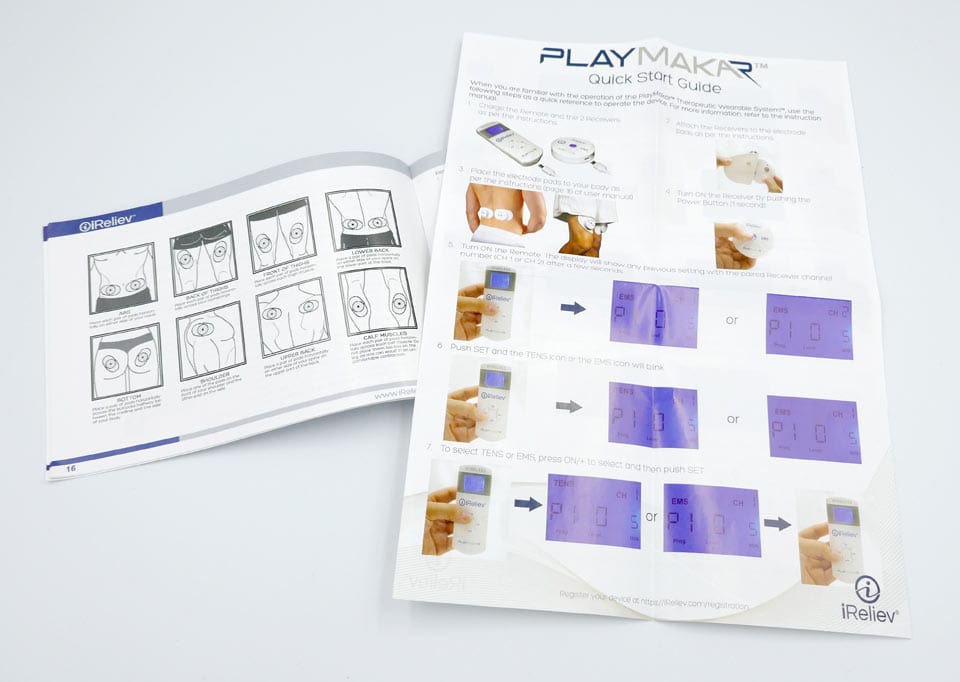
Fortunately, the quick start guide and instruction manual are both good and clear to follow. They’re more comprehensive than iReliev’s previous models, it’s nice to see the brand evolving and improving these.
iReliev always does a great job of making their screens compact but clear and easy to read. There is no unnecessary information cluttering the display.
While the screen isn’t the largest around, especially when compared to something like TechCare’s Plus 24 it doesn’t need to be to do what it needs to. The clarity of the information it displays really is superb.
Keeping the display small contributes to the compactness of the remote. If they had made the screen bigger it would compromise the size of the remote.
Backlit displays are a must in my opinion for modern TENS and EMS devices. They enable you to use the machine in dimly lit or dark situations. Fortunately, the screen is backlit.
Think about it, you want to relax in the evening with some TENS or EMS therapy.
Who wants to have to switch extra lighting on or have a lamp shining over their machine so they can read the screen!?
Not me! I don’t want to spoil the ambience when I’m trying to relax or unwind.
The backlight is efficient, it comes on when you press any button on the controller and automatically switches itself off after 10 seconds of inactivity. This is done to preserve battery consumption and not run it down unnecessarily.
It’s also worth noting here that the keyboard also locks itself after 30 seconds of inactivity. This means you won’t be bashing buttons – and accidentally changing programs – or unintentionally cranking the intensity up.
Battery
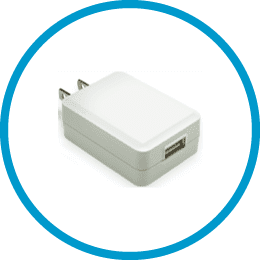
Both the remote and wireless receivers have built in rechargeable lithium batteries.
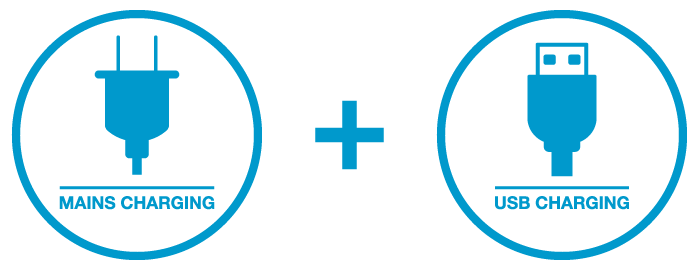
The kit comes with a charging cable and plug so both the remote and wireless receivers can be charged via USB or through the mains, at a wall outlet.
According to iReliev:
“You can expect to get around 3-5 hours of therapy per pod and 5-10 hours on a full charge of the hand control.”
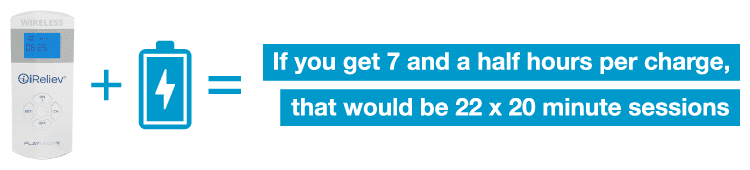
I’ve been keeping a record of my usage since I first charged everything up and I’ve gone 6 hours and 15 minutes so far. Neither of the pods have run out yet so I’m already considerably over that 3-5 hours per pod!

Update: After I’d originally written this the next time I used the machine, my channel 1 wireless receiver ran out of battery after 7 minutes of my next session!
So that was 6 hours and 22 minutes of use from the pods before they needed a charge. I’m happy with that, it’s considerably more than the expected 3-5 hours.
Then after 8 hours and 2 minutes of total use the battery ran out on the hand remote ran out.
- 6 hours and 22 minutes before I needed to recharge the wireless receivers
- 8 hours and 2 minutes before I needed to recharge the hand remote
In terms of charging time, iReliev states:
“Charging time for the remote is about 2 hours 20 minutes.”
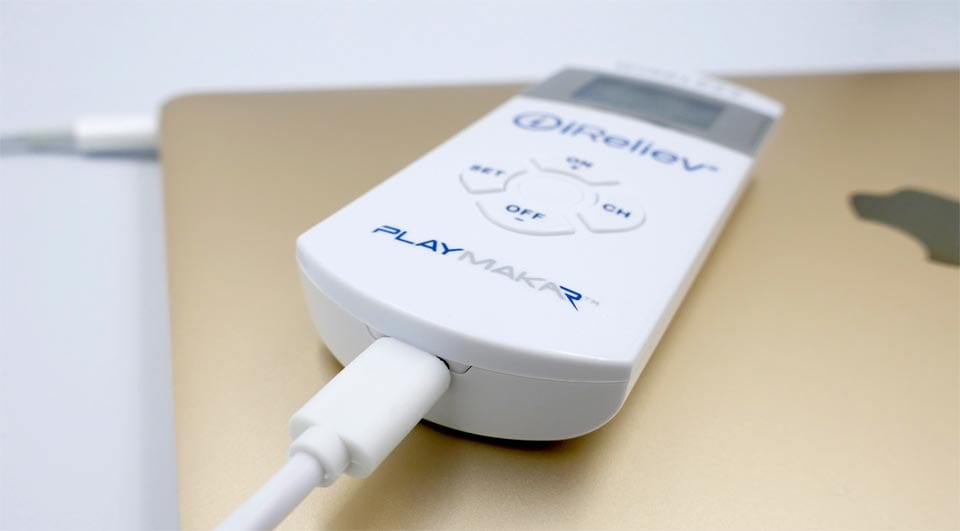
And:
“Charging time for the receiver pods is about 1 hour 30 minutes.”
It’s great not to have the ongoing cost of replacement batteries or having to remember to buy new ones if the old ones run out. The only thing you need to remember is to put your kit on charge when it needs it!
Size and Portability
All of the system is neat and compact, the remote measures in at: 4.3 in (height) x 1.75 in (width) x 0.65 in (depth).
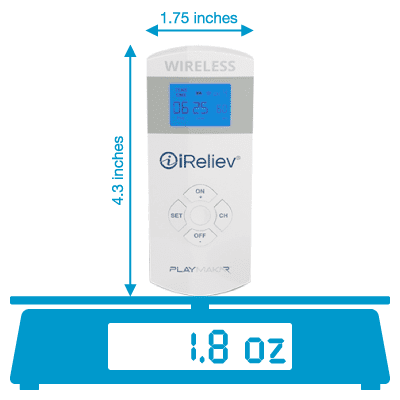
It’s certainly one of the smaller units around and is light as a feather to boot (weighing just 1.8 oz).
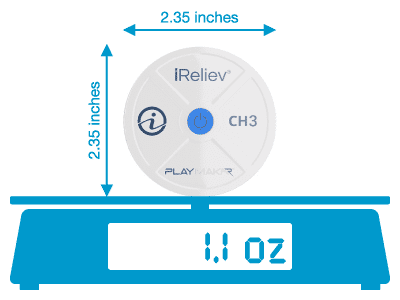
The receiver pods are 2.35 in (diameter) x 0.5 in (depth) and weigh 1.1 oz each so they’re not going to weigh you down either!
When I’ve reviewed other TENS and EMS machines in the past I’ve almost always said the same thing, I wish they shipped the device with a proper case.
I’m delighted to say that isn’t the case (pun intended) here. The system comes packaged inside a neat and compact hard carrying case with a handle.
It’s the perfect home for your machine, keeping all the accessories organized, while providing a layer of protection for any of those accidental drops!
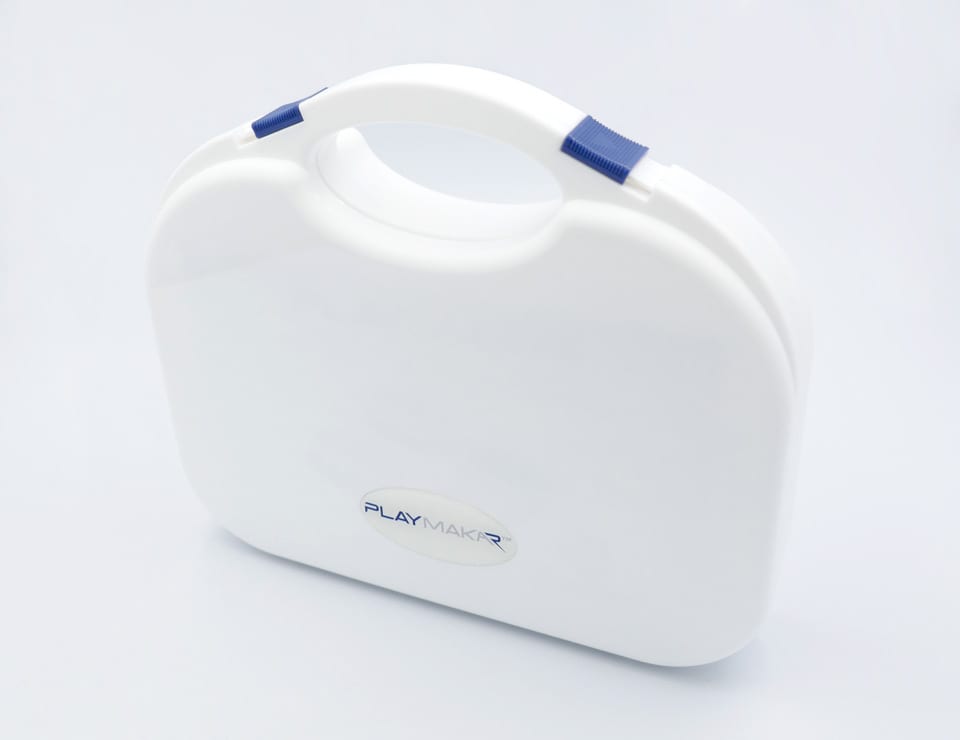
I’ve been harping on for a long time about how manufacturers should ship their devices with carrying cases. iReliev’s case for this product is just the ticket.
The case has been well thought out – made to measure – and even has space for the extra two wireless receivers, if you choose to add them to your setup.
The size of the machine and accessories, along with the carrying case makes this a very portable device.
Included Accessories
Inside the nicely designed box there’s everything you need to get started:

ET-5050 Wireless Hand Remote
2 x Wireless Receivers (CH1 & CH2)
2 x Self-Adhesive Electrode Pads
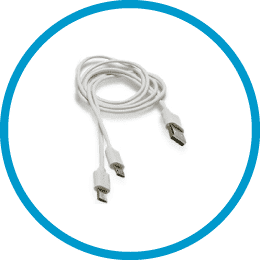
Dual USB Charging Cable
AC Adaptor

Quick Start Guide
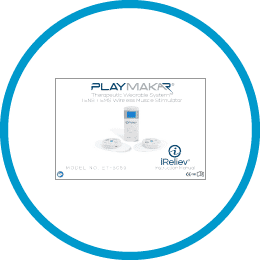
Instruction Manual
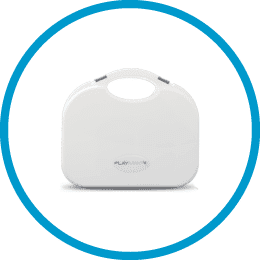
Carry Case
Could we be a tiny bit critical that there’s only the Dual USB Charging Cable in there? I guess I’m being picky here as I’m struggling to find anything to really complain about.
What I’m getting at is that if you need to charge the remote and wireless receivers at the same time there’s only the one cable to do this.
The dual charging cable allows you to charge both wireless receivers at the same time, which is great. But what about the remote?
Firstly, the remote and wireless receivers have different battery capacities and it’s unlikely they all run out of juice at the same time so it’s not really a problem.
But on the off chance… let’s think about this, who doesn’t have a load of USB cables knocking about in the house!?
If you do happen to be the odd one out, no need to sweat, you can pick one up like this from Amazon or another online store for a very small price.
The unit ships with 2 oval shaped pads, measuring 3 in x 5 in.
iReliev estimates that you’ll get up to 20-30 sessions out of each pad.

If you’re going to be a frequent user of your TENS EMS unit, say once a day and get 30 uses of each one that’s going to mean needing two replacements a month, if you’re using two pads each time.
Based on the same example usage as above, if you had purchased the Expandable Wireless Receiver Pods and were using four pads each time, that would mean you’d need four replacements a month.
- 28 sessions (12 hours and 12 minutes) and so far no need for me to replace the first set of pads
Unlike most other TENS unit electrodes these pads have a special proprietary fitting, designed specifically for this machine.
Just be aware, you can’t use any ordinary snap fit pads with this, you will need to use iReliev replacements. They have a double button on them for the wireless receivers to fit onto.
If you are going to use the machine regularly it might be worth checking out iReliev’s Dollar Electrode Pad Club.
On their website a set of these 4 pads retails for $29.95, however by subscribing you can get a set sent every week, month, other month or quarterly for just $12 a set.
Warranty
iReliev’s TENS EMS combination unit ships with a one year warranty, however this is extended to two years when you register your device with iReliev.
That can be done online or if you prefer the traditional method, you can fill out the registration card in the back of the instruction manual and post it to them. Note that this needs to be done within 14 days of the date of purchase.
The warranty covers parts and labor to the remote and receivers but:
“does not apply to damage resulting from failure to follow the operating instructions, accidents, abuse, alterations or disassembly by unauthorized individuals.”
So if there is any issue with the product that hasn’t been caused by the user, it should be covered under the manufacturer’s warranty.
Most TENS machines have a one year warranty. There are the a few machines, such as the Plus 24 by TechCare and HealthmateForever’s range that come with limited lifetime warranties.
On the lower end of the warranty scale, truMedic’s PL-009 ships with only 90-day cover so the two year warranty can be viewed as a bonus.
Consumer Reviews
With this being a fairly new product there isn’t a huge number of consumer reviews online. For the ones that are there, the users’ feedback and experience of using the product tended to be very good.
A recurring theme through the reviews was how much consumers love the fact that it’s wireless. I would echo this. I’ve been using both TENS and EMS machines for years and going wireless is a wonderful experience.
Anybody who’s used a wired TENS or EMS unit a few times will know that the cables can get in the way.
Plus, you have to keep the device very close to you because the wires are only so long. With this machine you can start your therapy, then pop it in your pocket or on a surface close by.
A review that struck me though was an updated one. Somebody had purchased the device and was problems with one of the receivers, it wasn’t holding charge. After the seller (iReliev) had seen this they offered to ship a replacement overnight.
The customer received the replacement the next day (along with some extra accessories) and was extremely complimentary about the seller.
Things like this can happen, especially with electronics. But the take away here is that the seller cares and it’s important to know that when purchasing a product like this. It gives you extra peace of mind and confidence in the brand.
If I’m buying a product like this I want to know that the seller takes pride in their products and individual customers matter to them. This demonstrates that iReliev does.
When I see something like this happen I’m more concerned about how it was dealt with rather than the initial issue.
Price
The MSRP for iReliev’s wireless TENS unit is $189.95. It is available directly from iReliev as well as from Amazon.
At the time of writing of I went on iReliev’s website and noticed a promotion, they were offering the third and fourth wireless receivers free when you purchase the device.
I can’t guarantee that promotion will be on forever but it’s certainly worth checking there as that receivers kit has an MSRP of $99.95. Adding the extra receivers transforms your device into a quad channel machine.
Summary
iReliev’s wireless TENS unit has become my go to device! I loved the product from the first time I used it and continue to. It’s neat, simple and easy to use.
The carrying case makes it great for travel so if you travel and need TENS and / or EMS on the go, it’s one of the best options out there.
The case won’t take up much space in your luggage which means it can be with you – ready for action – every time you need it.
This fantastic, all round system is highly versatile, well designed and performs admirably.
TENS, EMS, wireless, quad channel. A feature-packed device that ticks all the boxes, it does not disappoint.
It’s a great tool for anybody who wants something to supplement their training and on demand to relief for muscle and joint pain.
You pay for a mid-range machine but get features of a higher priced machine.
However, if it’s still outside of your budget, you should take a look at iReliev’s TENS EMS Unit Muscle Stimulator. It offers the same programs as this only without the wireless or quad channel capabilities.
Alternatively, if you’re just after a TENS machine for pain relief, check out our review of iReliev’s Dual Channel TENS Unit. It’s a terrific little machine and has the exact same TENS programs as this but again, without the wireless or quad channels.
But if like me, you choose to make iReliev’s wireless system your go to TENS and EMS device, you’re not going to be disappointed.
Features: 4.3 / 5


Ease of use: 4.5 / 5

Value for money: 4 / 5
Overall:
In the Therapeutic Wearable System, iReliev has created an outstanding TENS and EMS unit at an extremely competitive price.


